A couple of weeks ago or so, my friend Michael mentioned to me that I should buy this domain. I’ve been debating for some time now putting something out there where I could collect some musings, examples, and adventures. So I went ahead and bought the domain through Gandi, set up a forwarding e-mail address, and everything was great! Well, except for having an actual website that is.
Nowadays there is an absurd number of ways one could go about creating and hosting a site, but since I like to take opportunities like this to pick up new skills I spent some time looking into some alternate solutions, and I decided that using Hugo to statically generate my pages was the easiest route, for a few of reasons:
- I’m neither a good front-end developer, nor have I ever focused on becoming one, which means my HTML and CSS are relatively poor
- As a Go user and advocate I’m immediately drawn to solutions based on the language
- Since it only requires static hosting, I could use S3, and pay cents a month to host my website, and in turn get better acquainted with AWS (I’ve used EC2 and S3 extensively at work, but with very little exposure to the management side)
What follows is a summary of what I did (and wish I would have done from the get go) in order to get everything working. Much of it is based on Joe Lust’s very helpful blog post, while also filling in a couple of gaps where I had to do some tinkering of my own. Also, note that while I used Hugo to generate my static site, the following deals almost entirely with the AWS configuration, and can easily be used for any other static website content.
What the stack was
I started off with Gandi holding my domain name and using it for the email settings corresponding to the domain, using Gmail as the forwarding address and registering the smtp address to be able to send emails from my inbox. The idea was to use S3 for file hosting, Route53 for DNS services, and CloudFront in order to use SSL, and to redirect the domain name to the Hugo static files in S3.
What the stack is
There was a lot of really funky leg work to get the DNS settings to play well between Route53 and Gandi, so once I figured out that the transfer charge added a year to the domain’s registration, I didn’t hesitate to move the domain to Route53 itself. This did negate the work I’d done to set up the mail forwarding and SMTP forwarding, and I ended up using Mailgun as a mail provider for the domain.
If you’re reading this, and about to start from scratch I’d recommend you start by creating your domain and host zone through Route53.
Getting started
This post assumes that you already have an AWS account, and that you have the AWS CLI tool installed. The following sections will show how the stack was configured as if done via the console, but if you’d rather do the set up via the command line, I’d recommend following the aforementioned blog post from step 2 onwards. That said, each step in this write-up includes a couple of gotchas that I ran into which could be helpful while following along with the command line instructions.
1) Register Domain and Host Zone one Route53
Using the the web console, navigate to Services, and then Route53. There should be a domain registration section, where you can either register or transfer. If you already have a domain, keep in mind that the rest of this post was written as though the domain was registered with AWS.
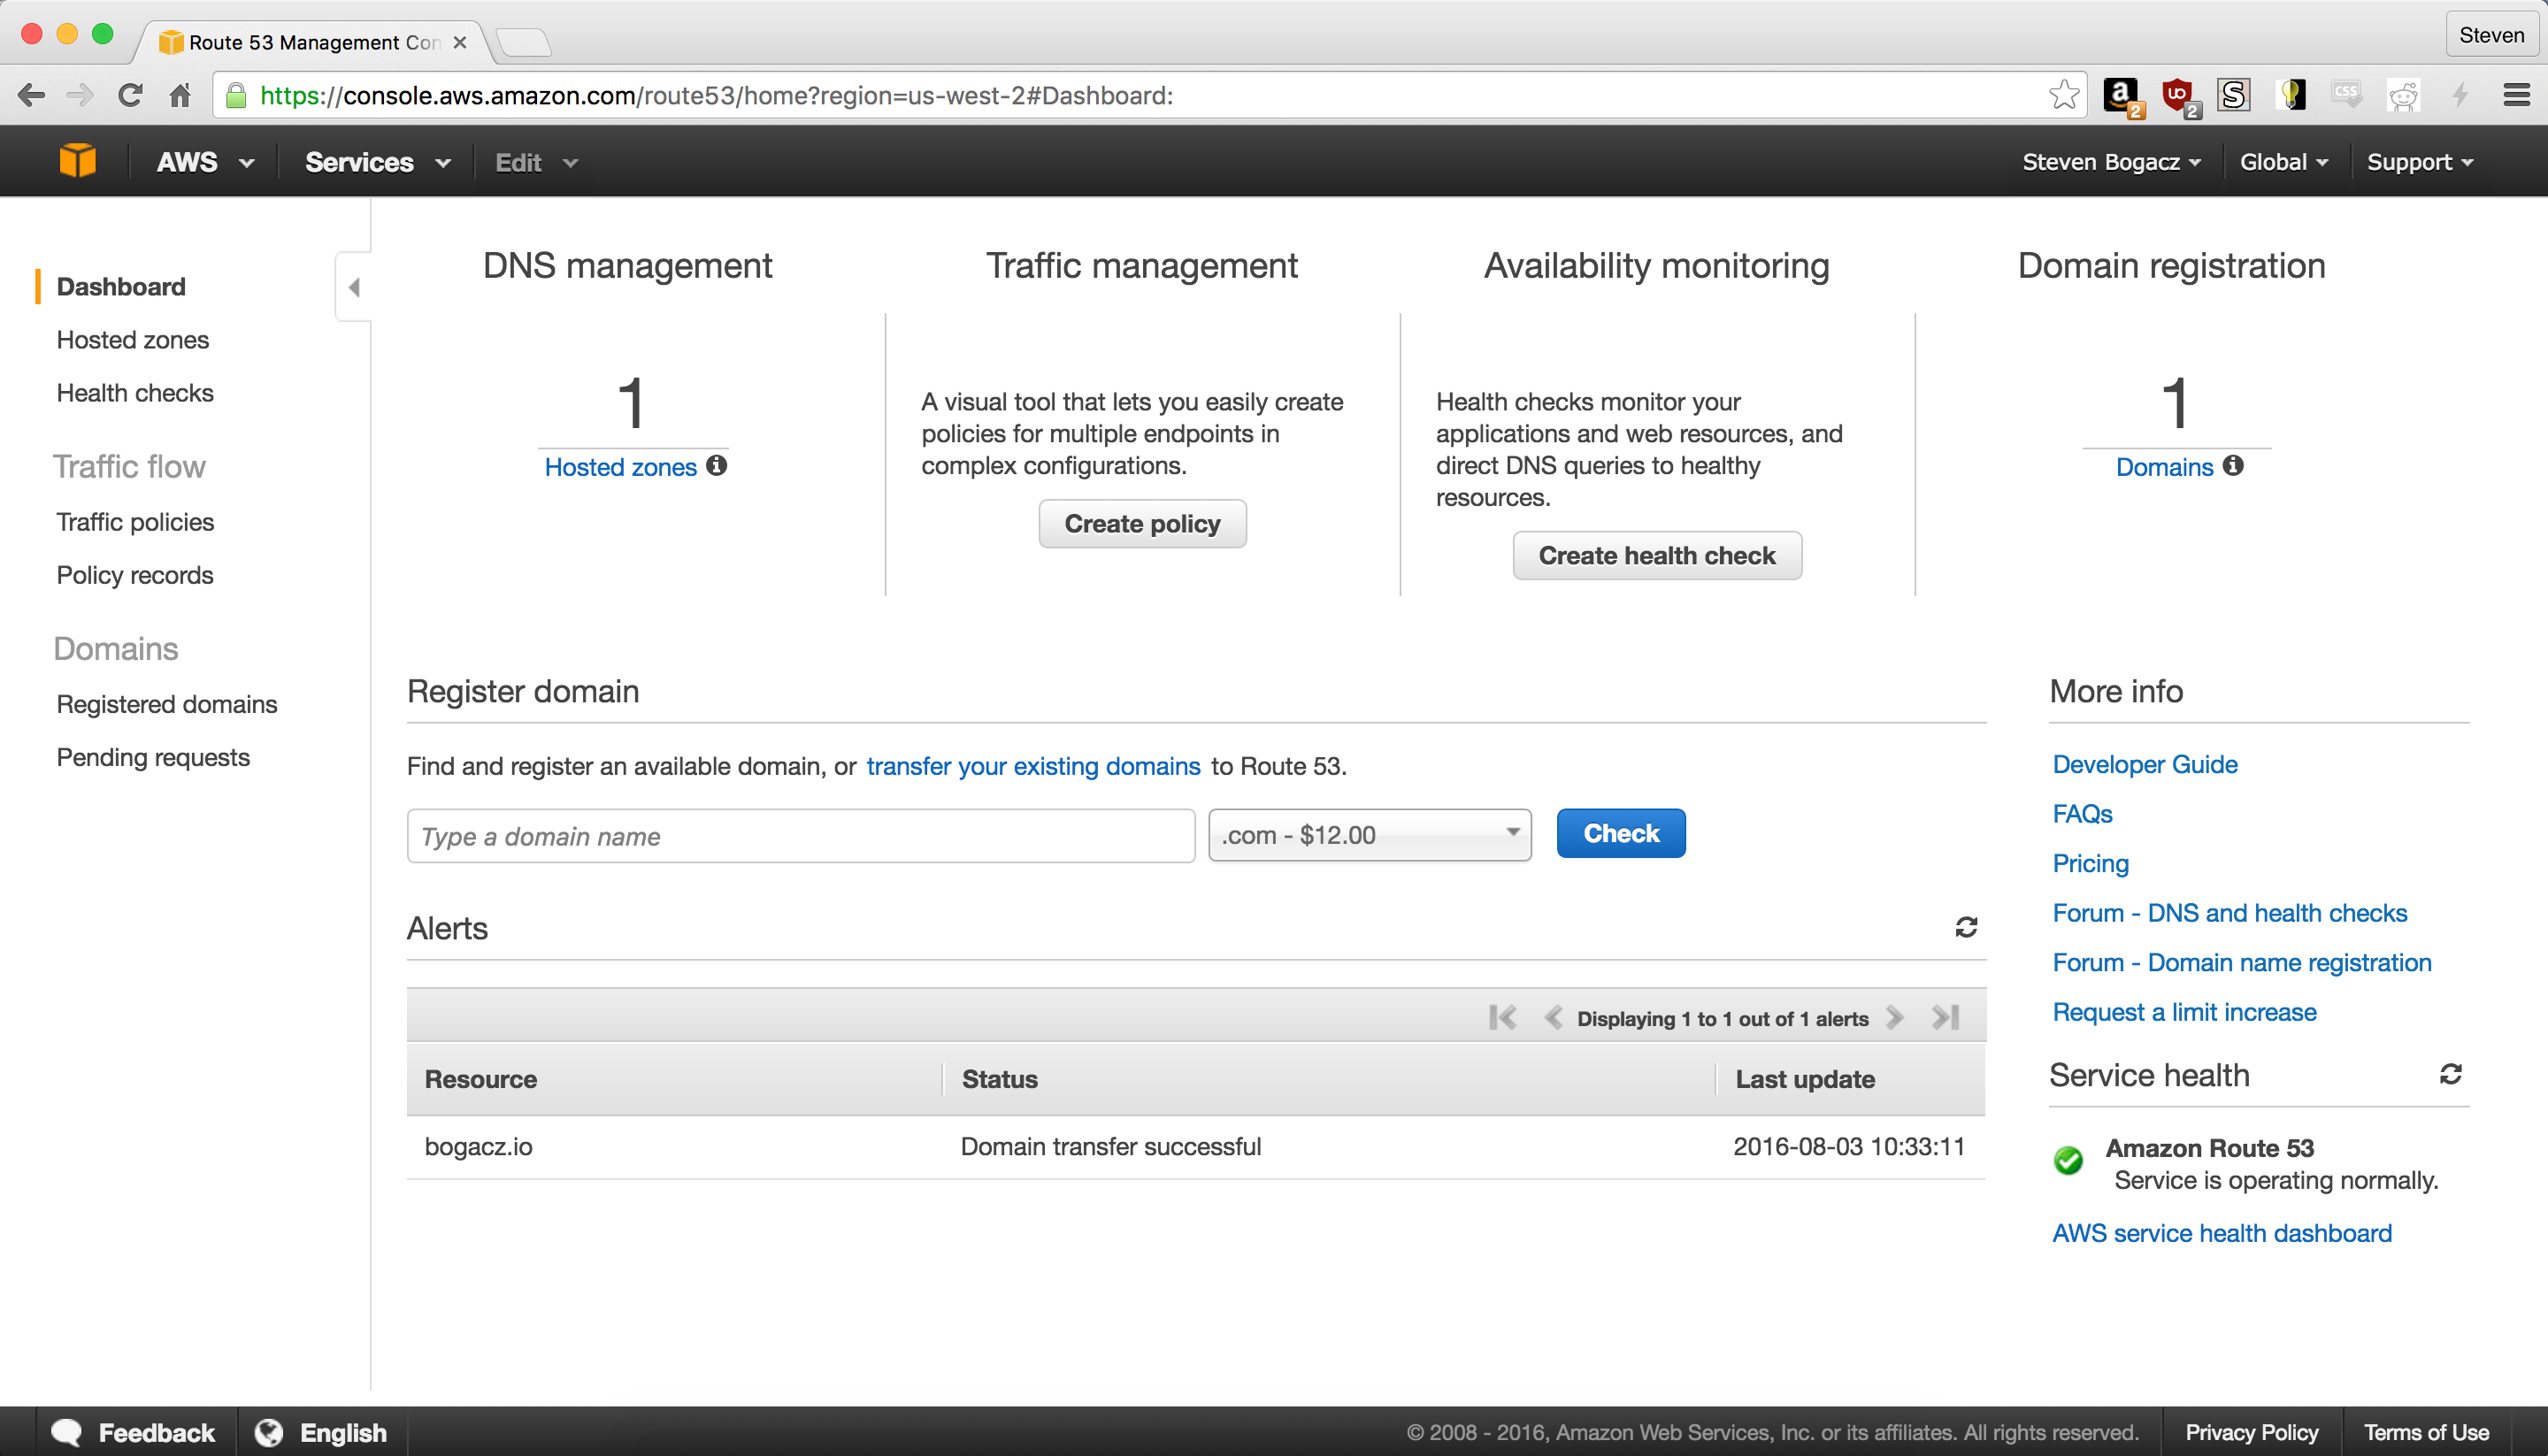
Once the domain is registered, navigate back to the Route53 main page, and go to the DNS Management section to add a hosted zone. Click on create Hosted Zone and use the domain name you registered in the Domain Name field. Feel free to leave a comment, which can be helpful for management the more hosted zones you create.
2) Create S3 buckets to host your site’s content and logs
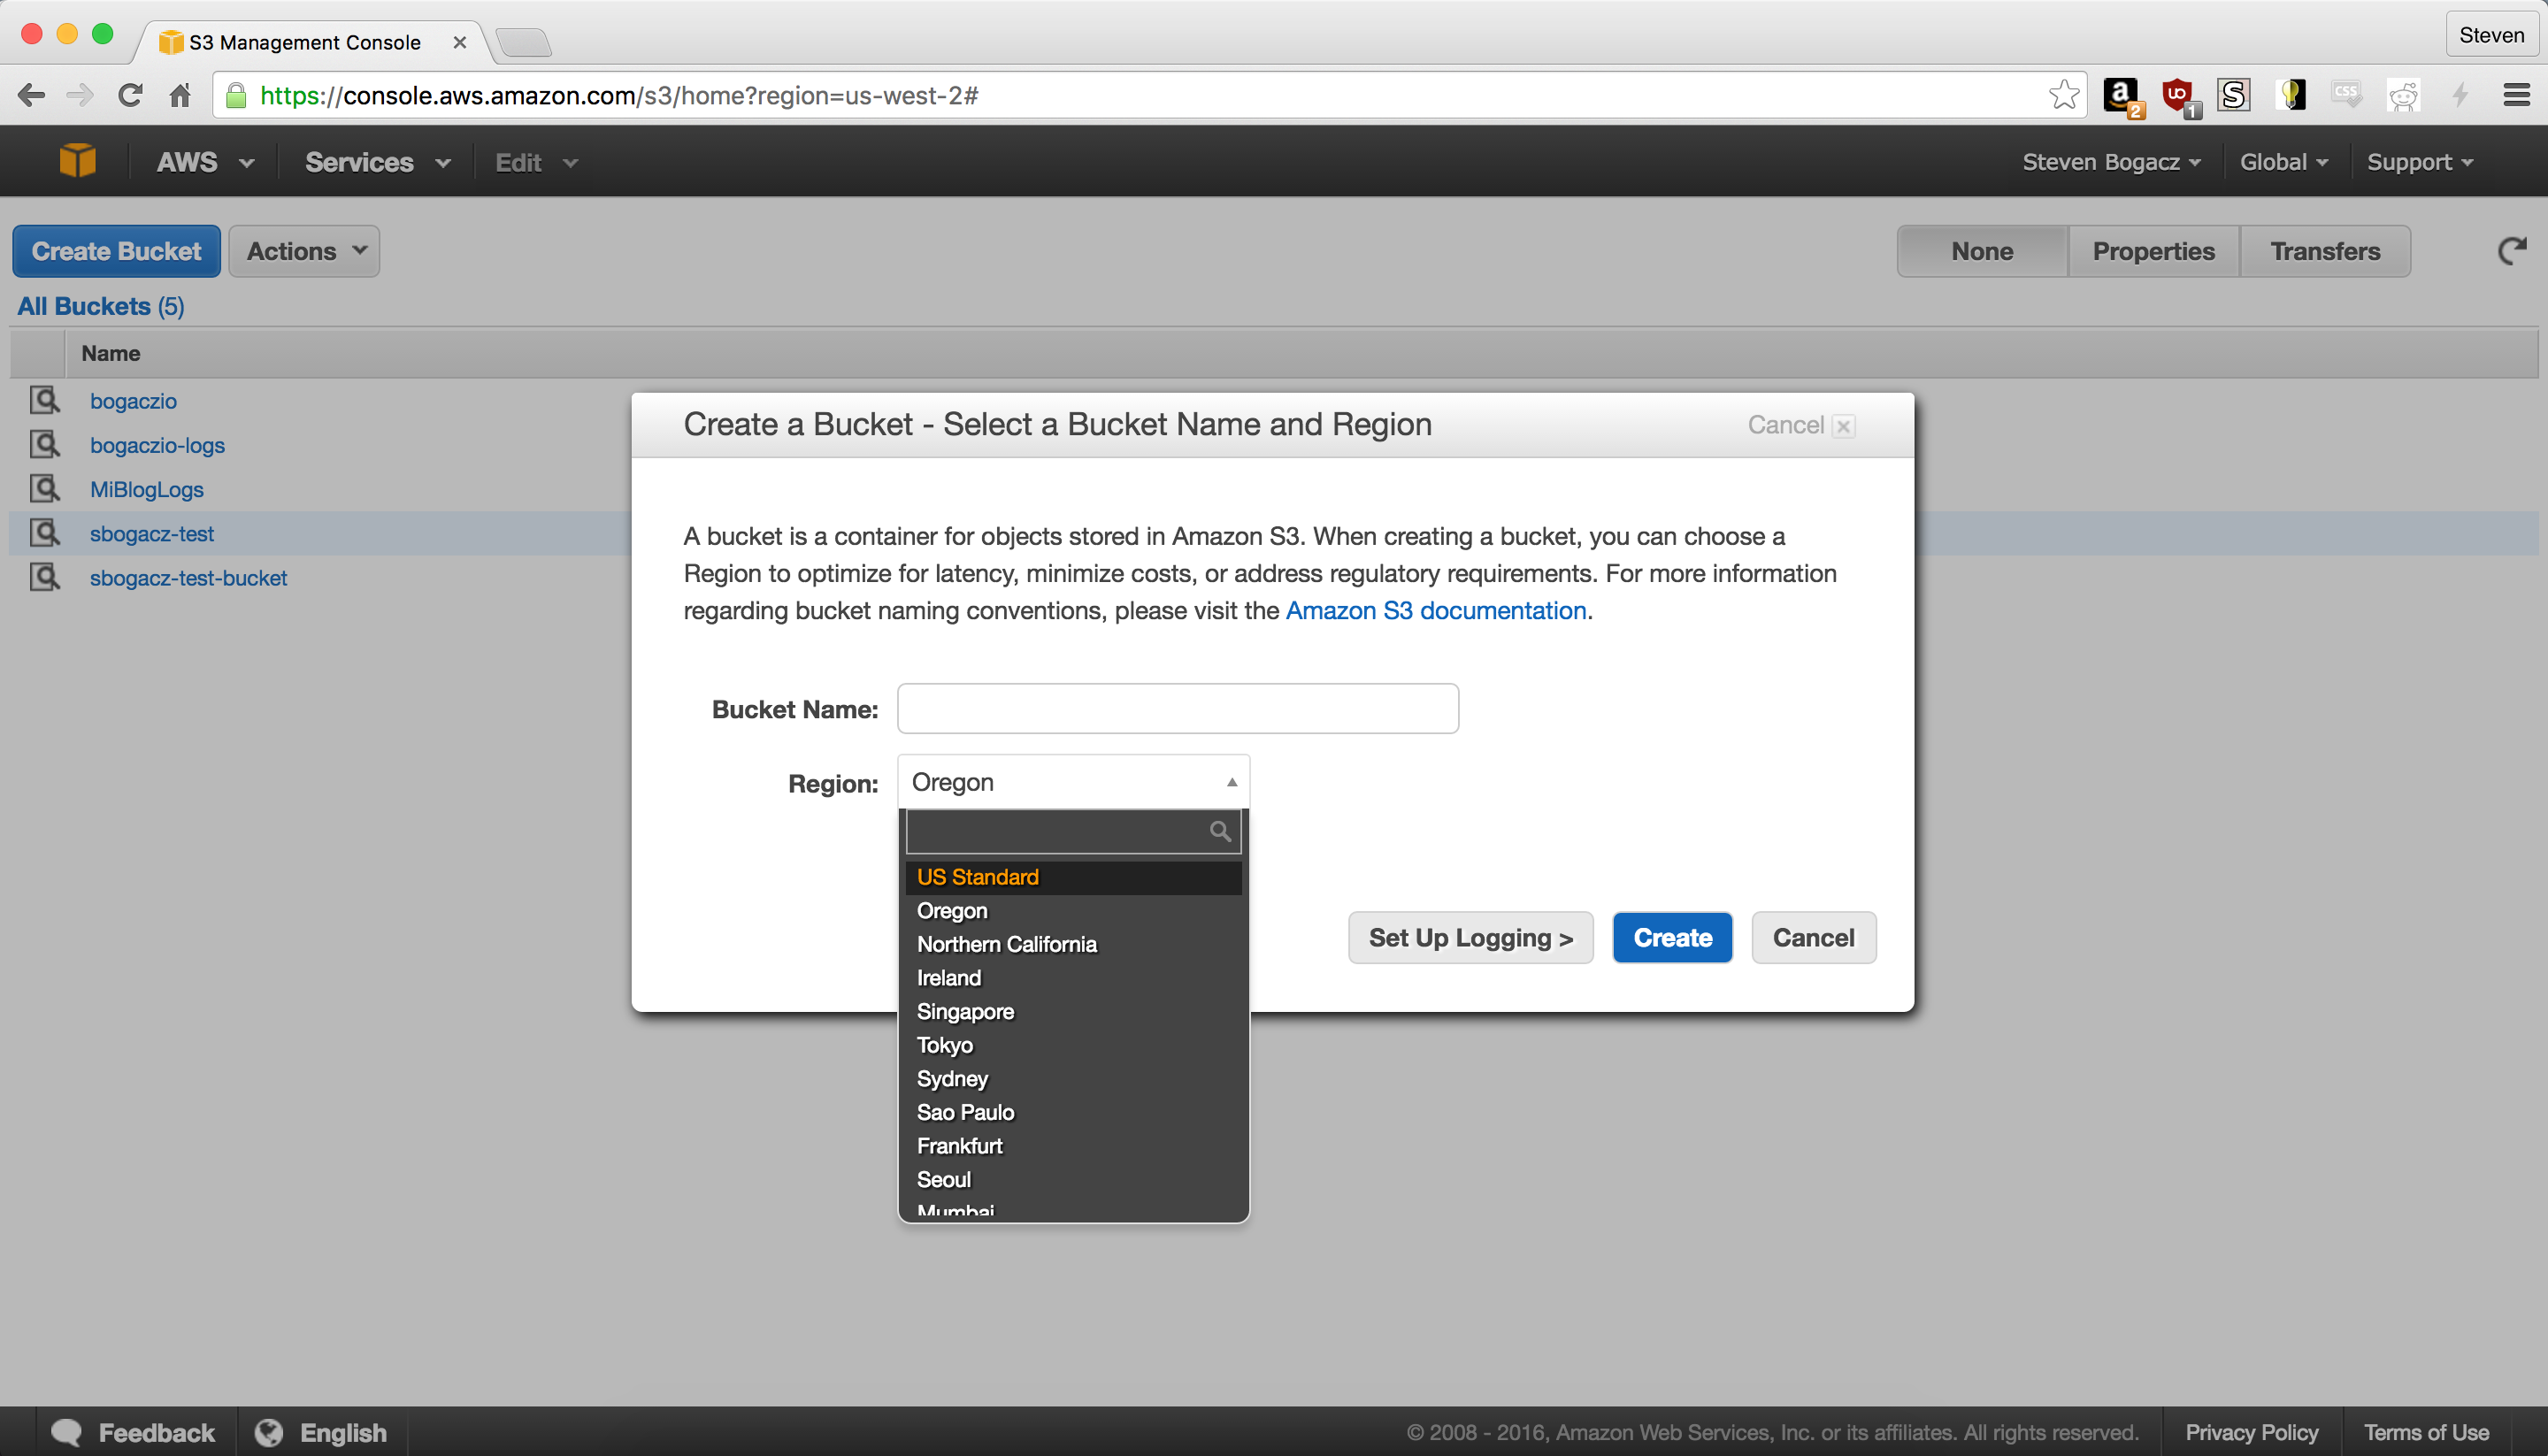
We’ll have to create two buckets, one for our content, and one for logging the requests from CloudFront and our content bucket. Before we actually create the buckets, we need to come up with names for them. There are two things to keep in mind * The S3 namespace is shared across all users, therefore your names must be unique, but ideally still indicative (to you) about their purpose. * In order for the names to be considered valid by CloudFront, they have to conform to some rules, which include all lowercase, and no underscores. This is true for both the content and logging buckets. * These buckets should be in US Standard (US East), because once we set up CloudFront, the only ACM certificates that will be valid are those issued from this region, and setting up the infrastructure to cross regions is no mean feat.
In the UI, this is very straight forward. Navigate to the S3 Dashboard and create the content and logging buckets according to the point above.
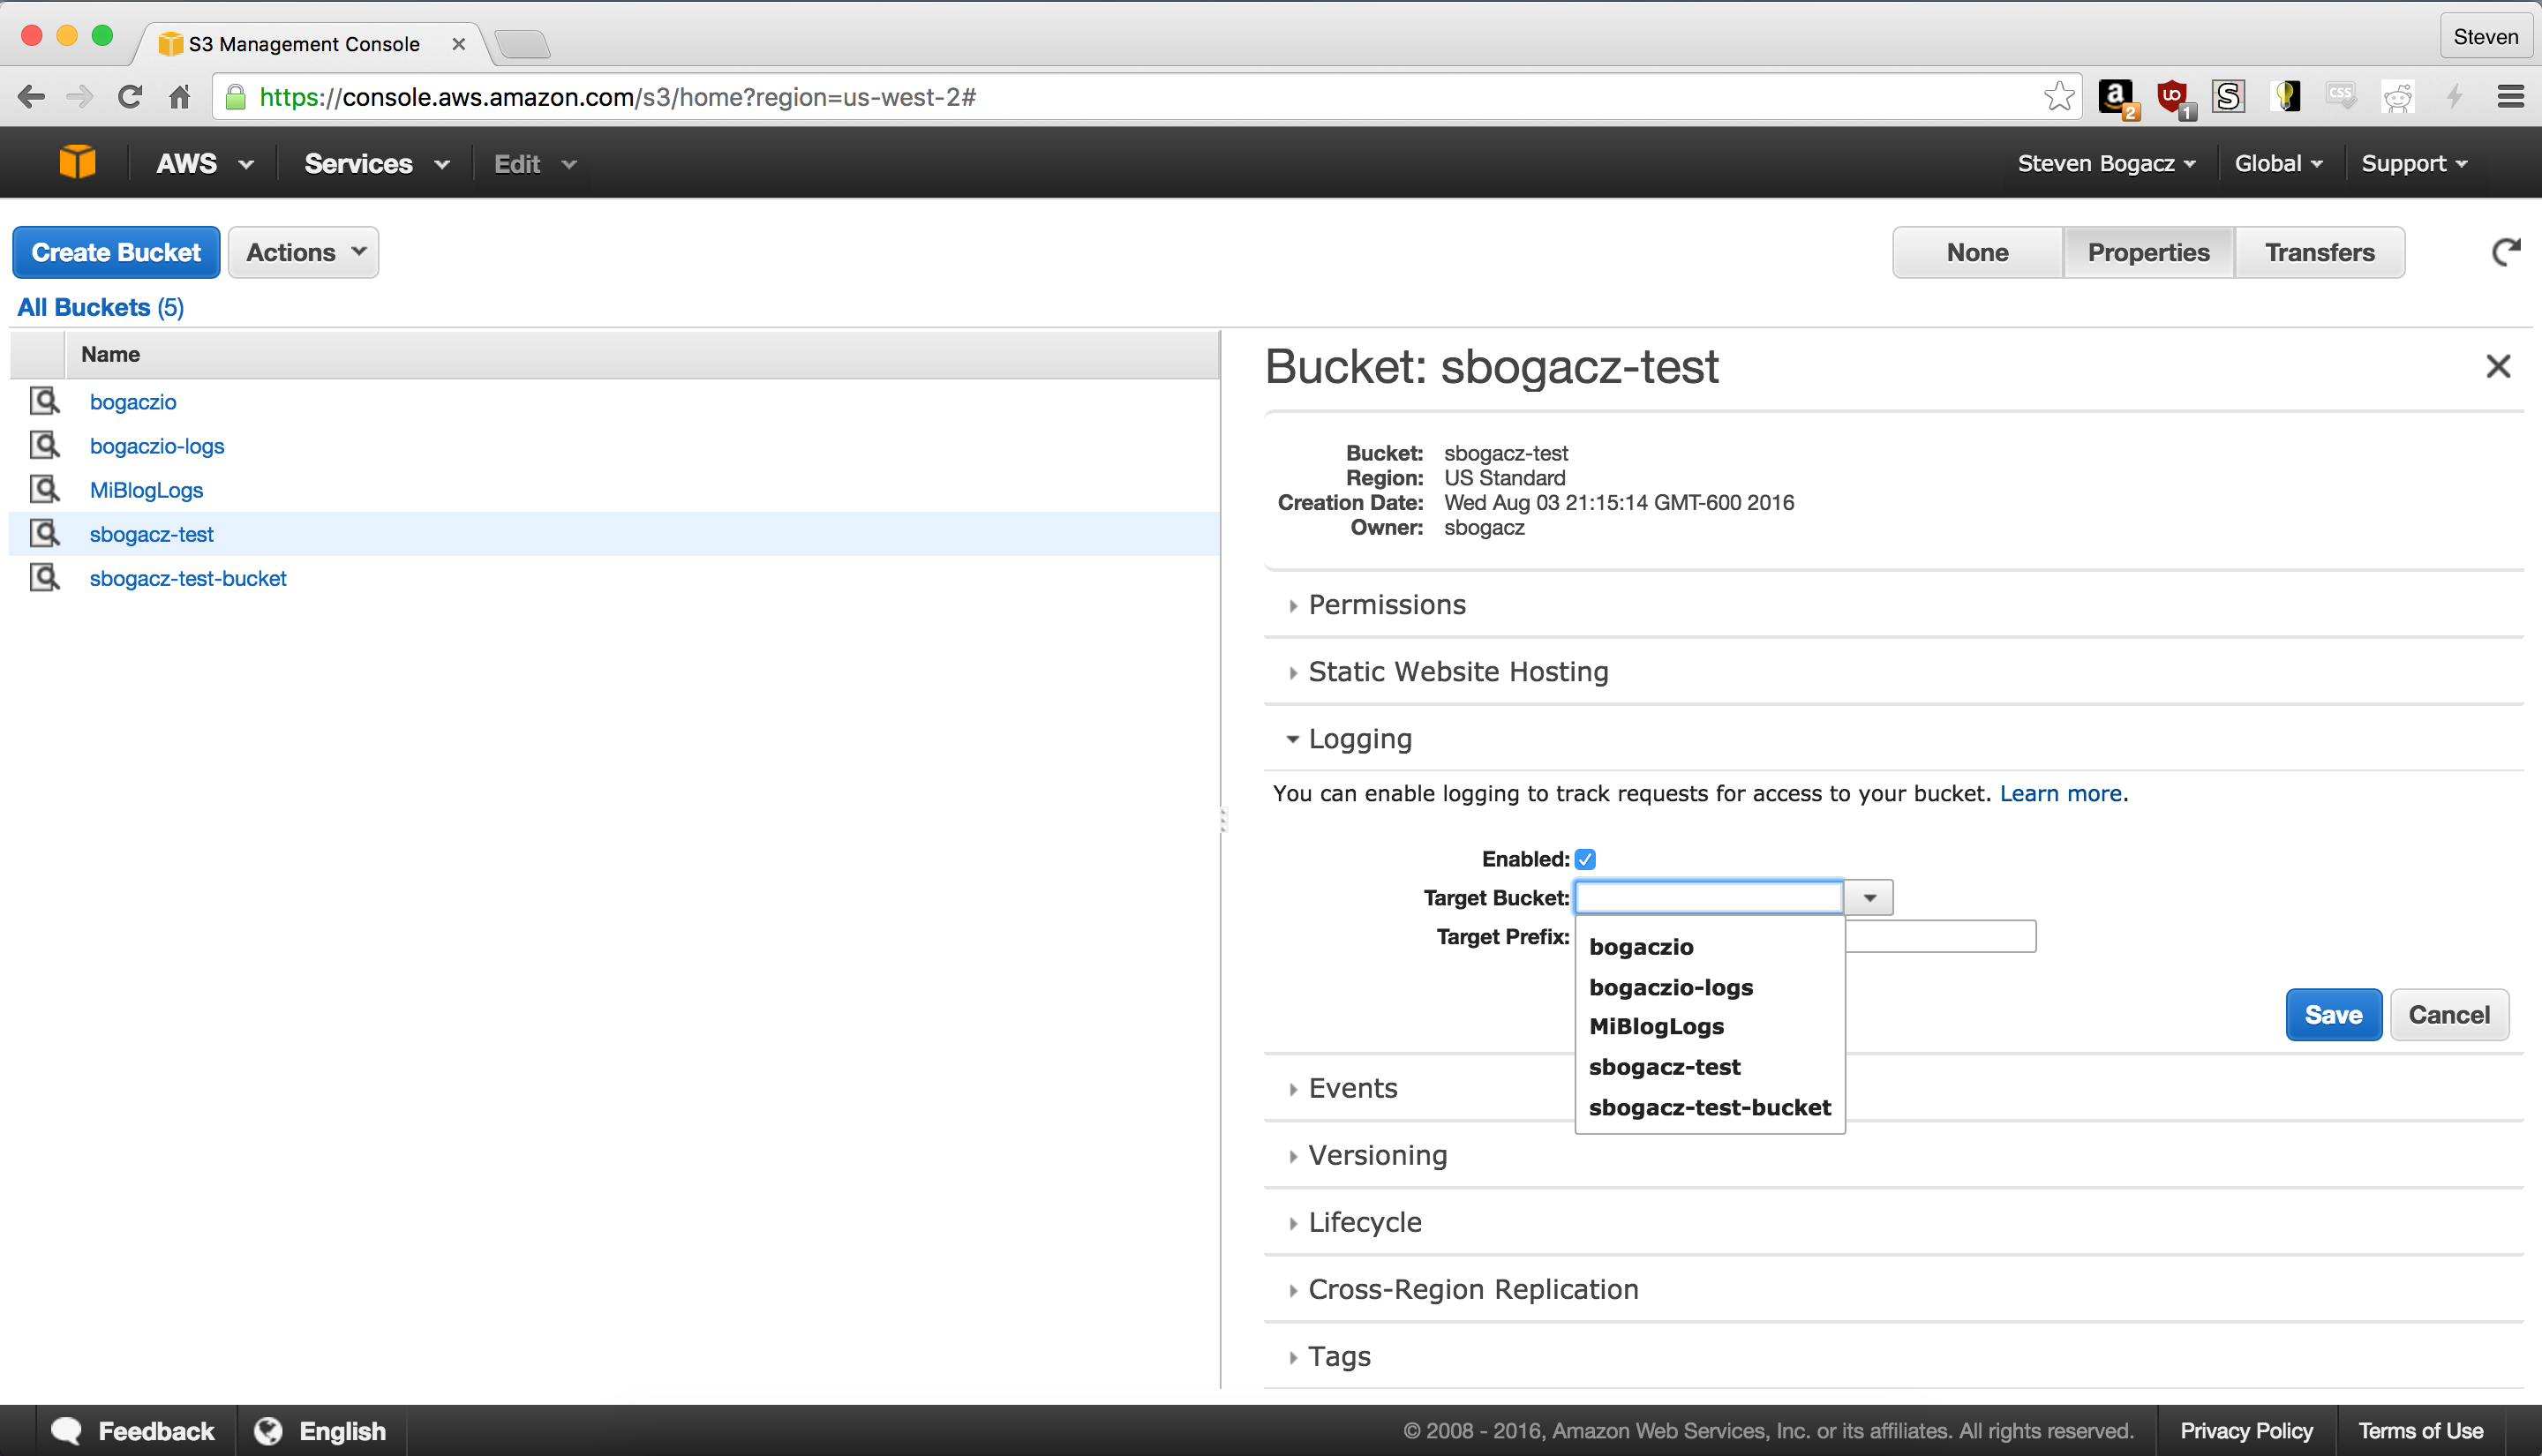
Then click on properties, and your content bucket, and navigate to the logging drop down, and enable it, and point it to your logging bucket.
Then click on the static website hosting, set Index to index.html and Error page to 404.html. Think of this as the stub of the website, before we load the Hugo static files.
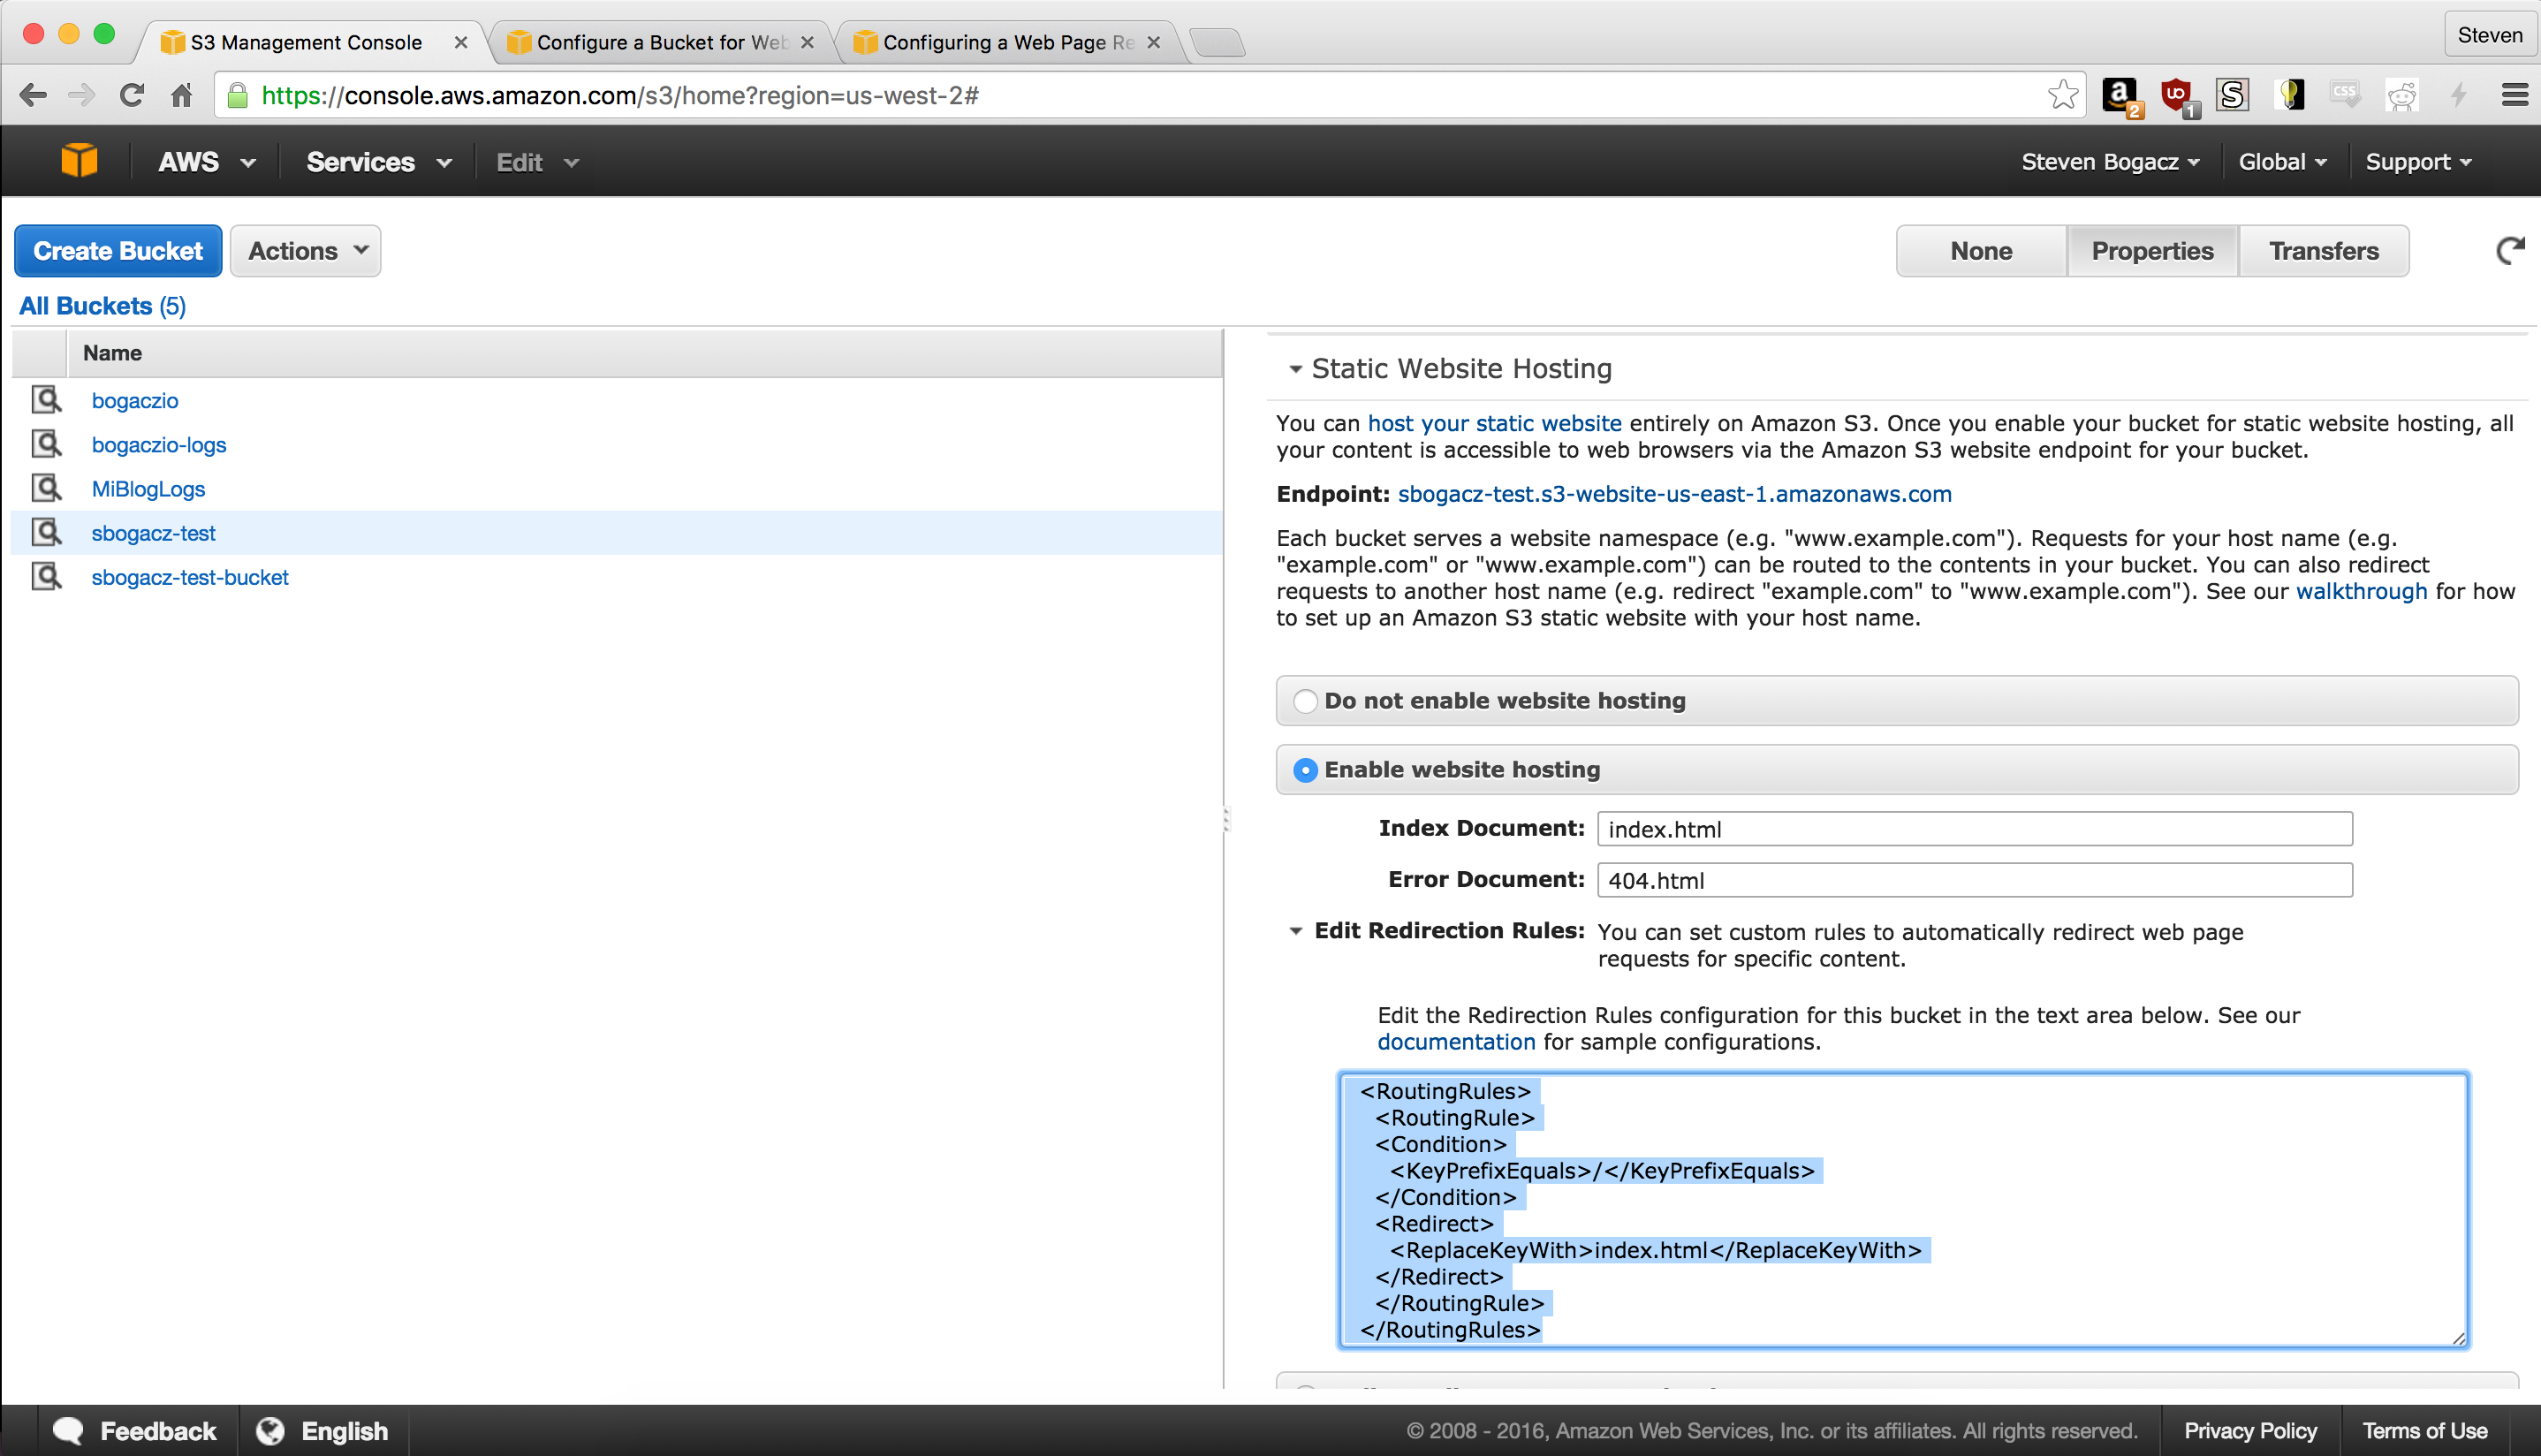
The xml I used for the routing rules is below:
<RoutingRules>
    <RoutingRule>
    <Condition>
        <KeyPrefixEquals>/</KeyPrefixEquals>
    </Condition>
    <Redirect>
        <ReplaceKeyWith>index.html</ReplaceKeyWith>
    </Redirect>
    </RoutingRule>
</RoutingRules>
3) Get an SSL certificate for your domain
Another great reason to set all of this up using the AWS stack is that you can get free SSL certificates from them. To do this you have to navigate to the Certificate Manager Dashboard from the Services drop down in the nav bar.
NB! Make sure you’re in the U.S. East Zone to get the certificates! They won’t work (for this use case) otherwise!
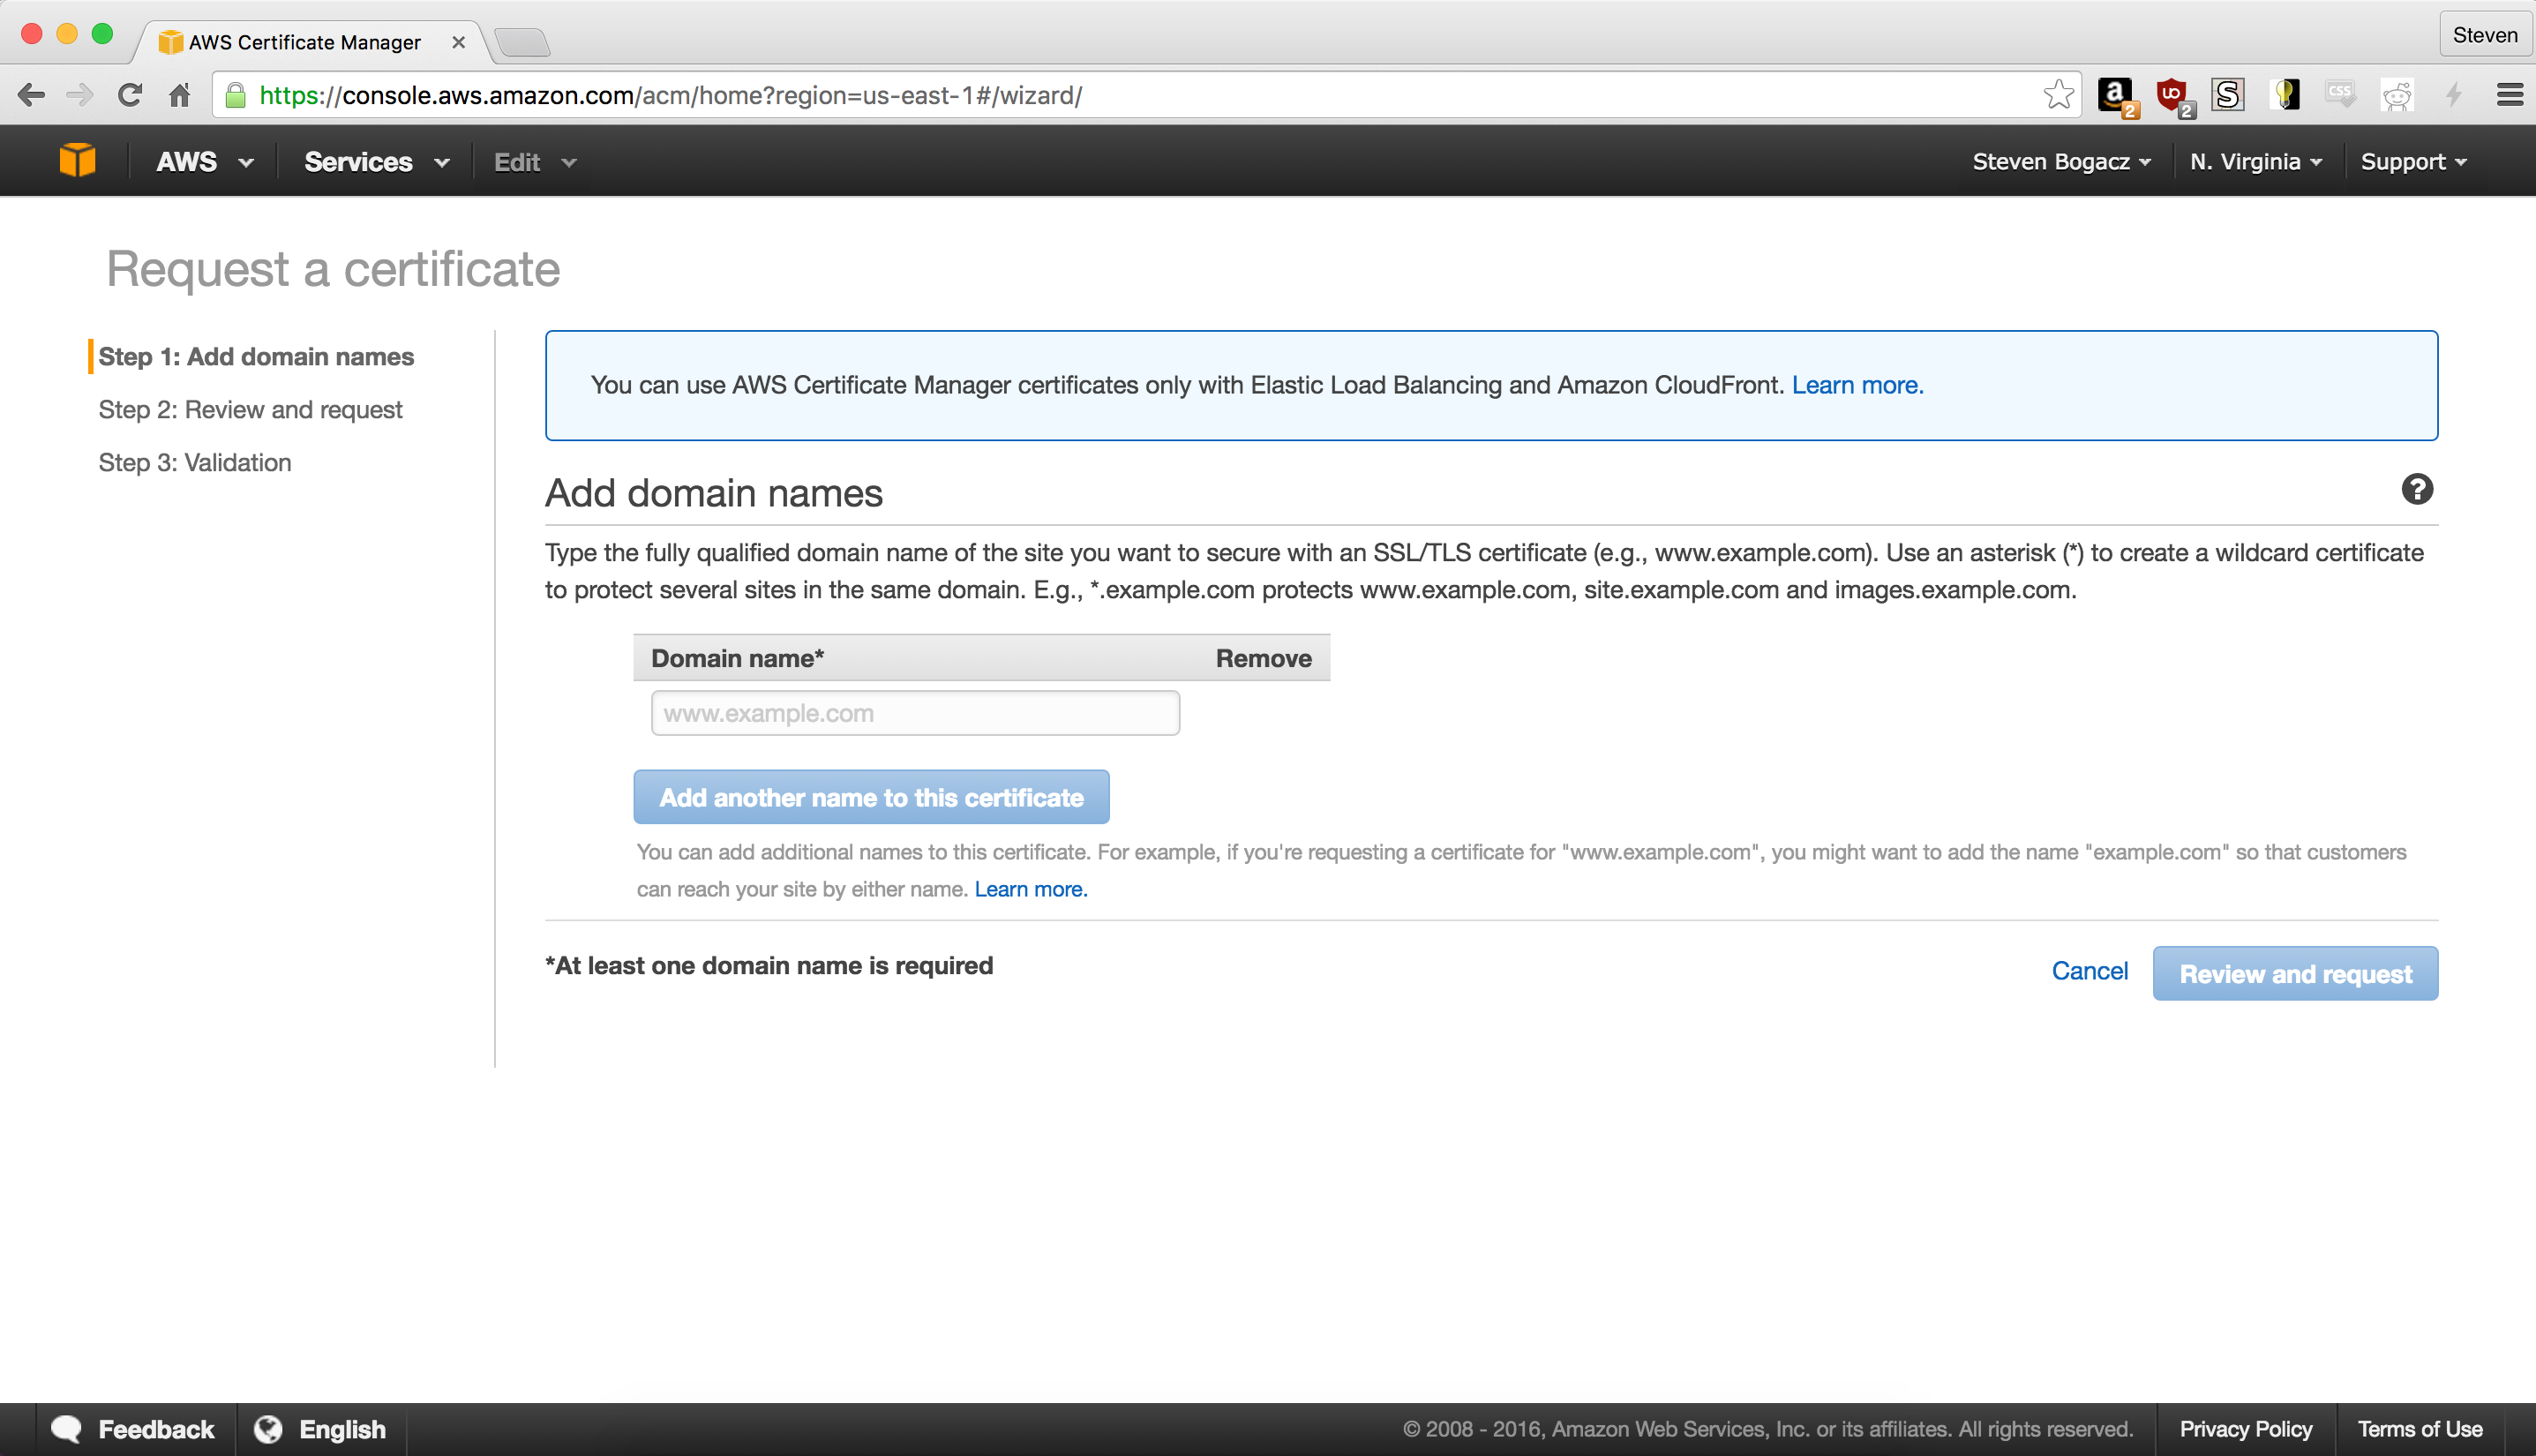
You can do that by looking in the upper right corner, where the zone should be the middle of three buttons. If it doesn’t say “N. Virginia” then click on it, and choose U.S. East from the dropdown. Once you’ve verified your zone, go to the “Request Certificate” page and type in your domain into the text field. Click on “Add another domain to this certificate” and add your domain again, but this time with the www prefix (if you used that for the first input, enter the domain again sans the prefix).
4) Configuring CloudFront AKA The Hard Part
The CloudFront part of the stack is on some level the configuration by which the public accesses your website. It resolves the domain you previously registered, exposes/supports an SSL connection to your site, and provides Edge server locations around the world, which makes for a quite a respectable configuration for you brand new domain.
Origin Settings
In order to take advantage of the redirecting web configuration we used in our S3 bucket above, we want to make a couple of changes from the default CloudFront definition.

Starting from the top, we want:
Origin Domain Nameshould be the public address of your content bucket, probably something like “.s3-website- .amazonaws.com”. E.g. “mynewsite.s3-website-us-east-1.amazonaws.com” Origin Pathcan stay emptyOrigin IDshould be something descriptive. I opted for “<bucketName>-origin”- No custom headers
Default Cache Behavior Settings
There’s a lot of information in this section, and I’ll do my best to explain settings as I go.
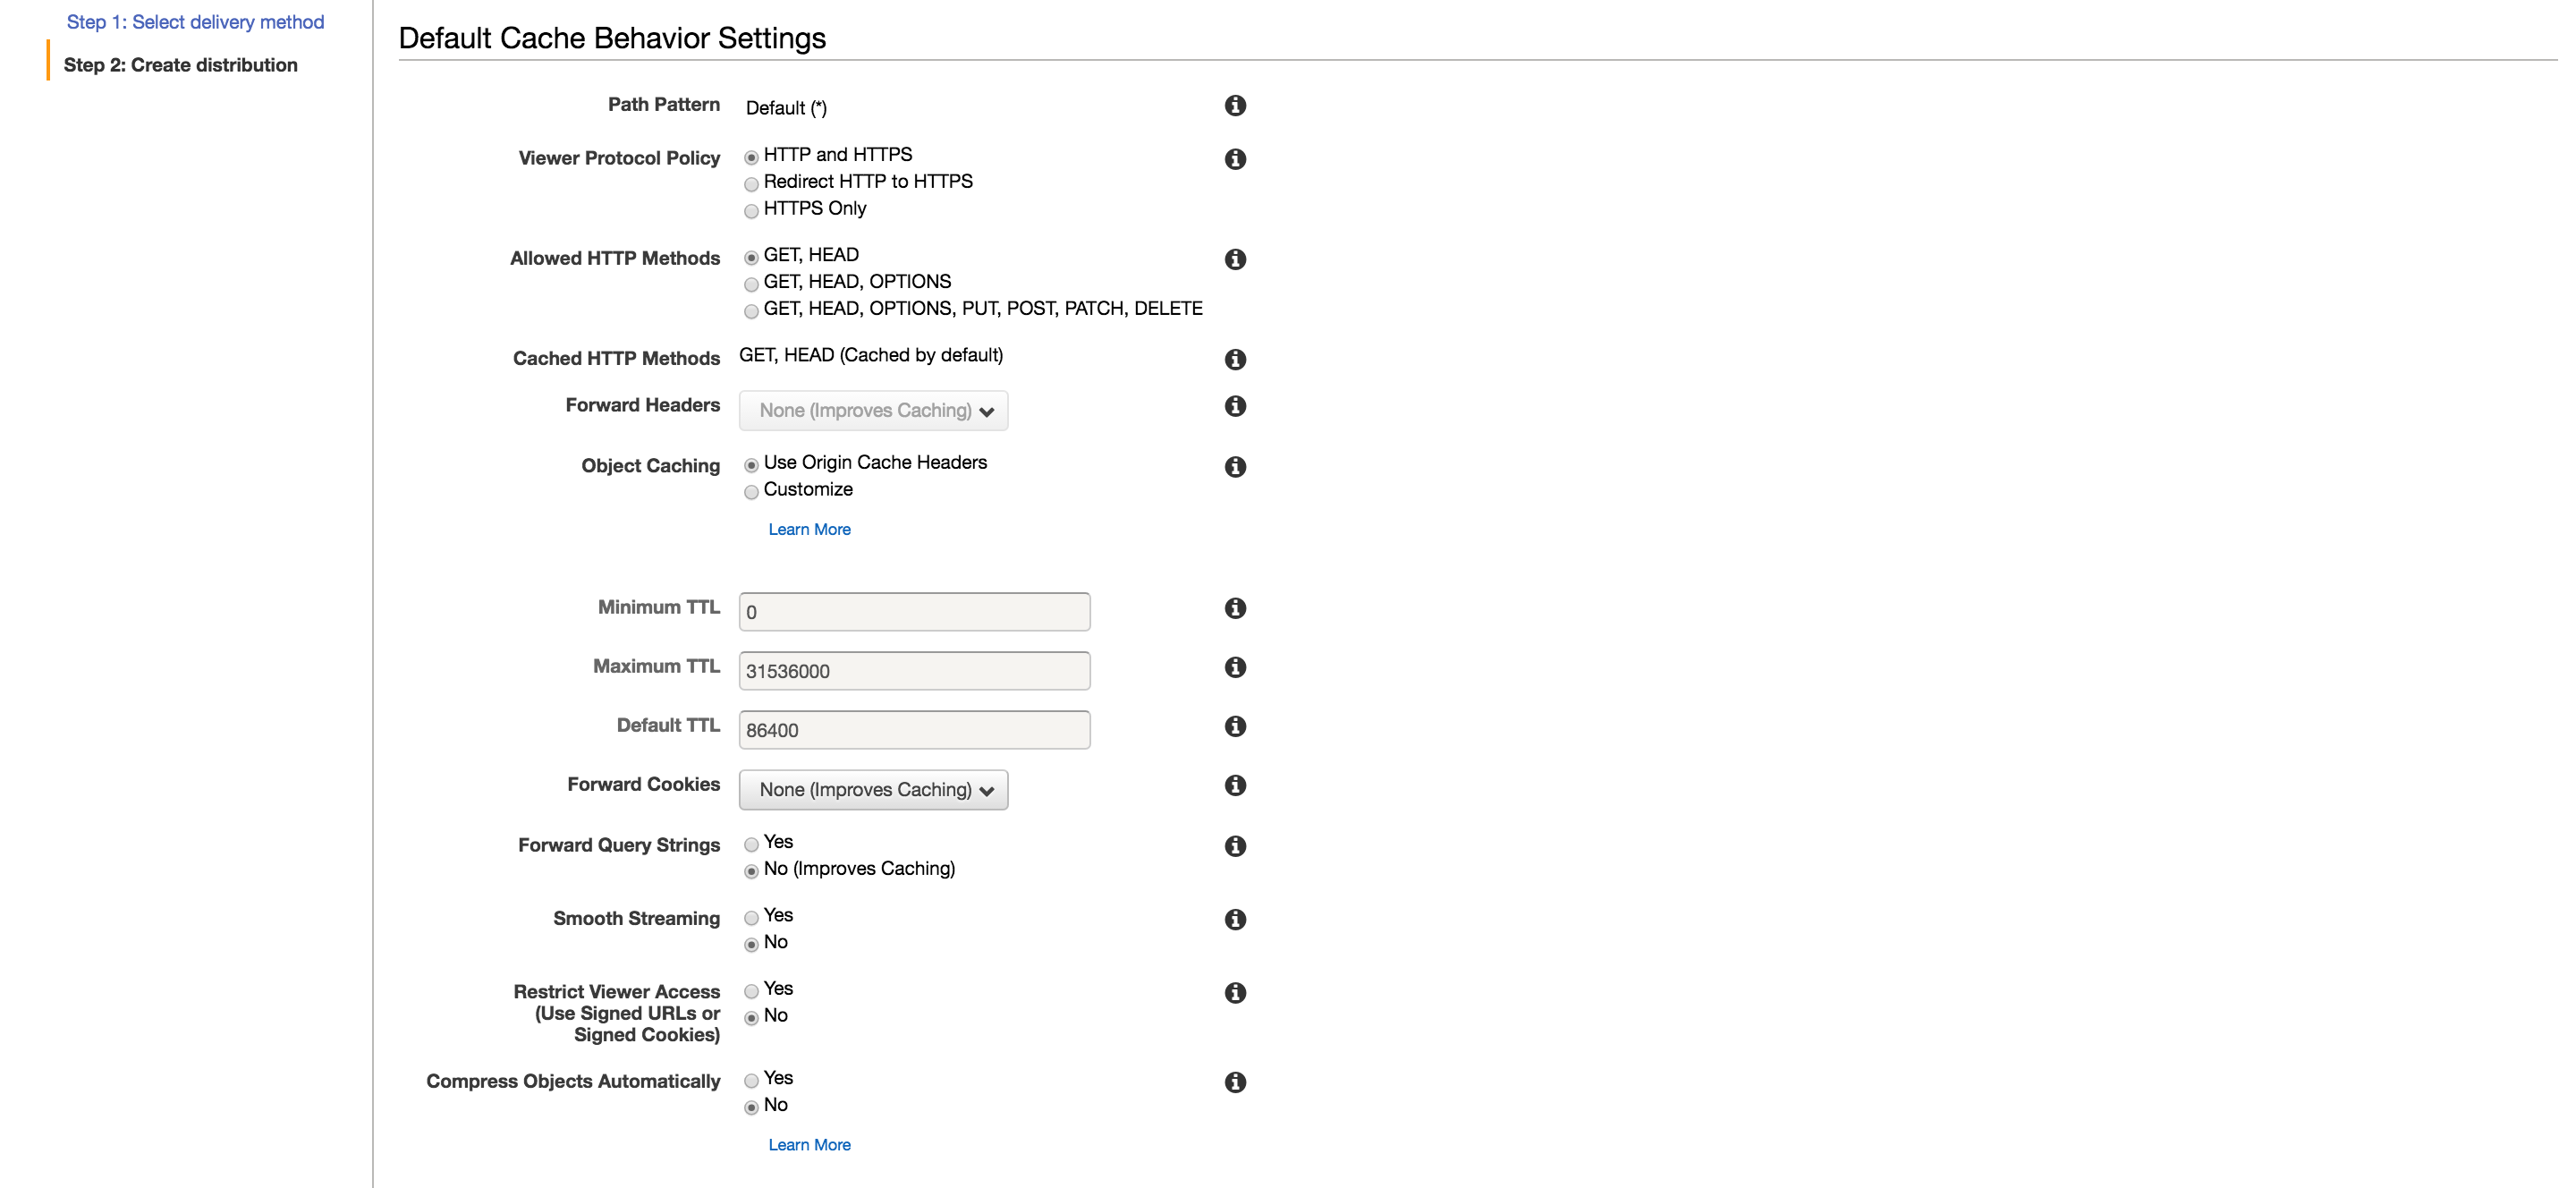
Based on the image above, the configuration should be roughly
Viewer Protocol Policyshould be set to “Redirect HTTP to HTTPS” to both make sure everyone is on the site is using SSL. This is different from HTTPS only, and will play nicely with the HTTP being used for the S3 static website hosting.Allowed HTTP Methodsshould be “GET, HEAD” or “GET, HEAD, OPTIONS”. Since our Hugo website is static, the other methods won’t be allowed.Cached HTTP MethodsIf you chose “GET, HEAD” they are cached by default. If you also chose OPTIONS, you could cache those results as well. In case you don’t know, OPTIONS is simply an HTTP verb to ask what methods are allowed on a given resource. Its use is not widespread at the moment.Forward Headersis fine as isObject Cachingcan be used as is, with a default of a 24 hour cache expiration, although I opted to customize mine and reduce the time to 30 minutes (1800 seconds)- The rest of the defaults are OK until
Compress Objects Automaticallywhich we want to set to yes, so that we can gzip content where possible to save bandwidth and reduce latency
Distribution Settings
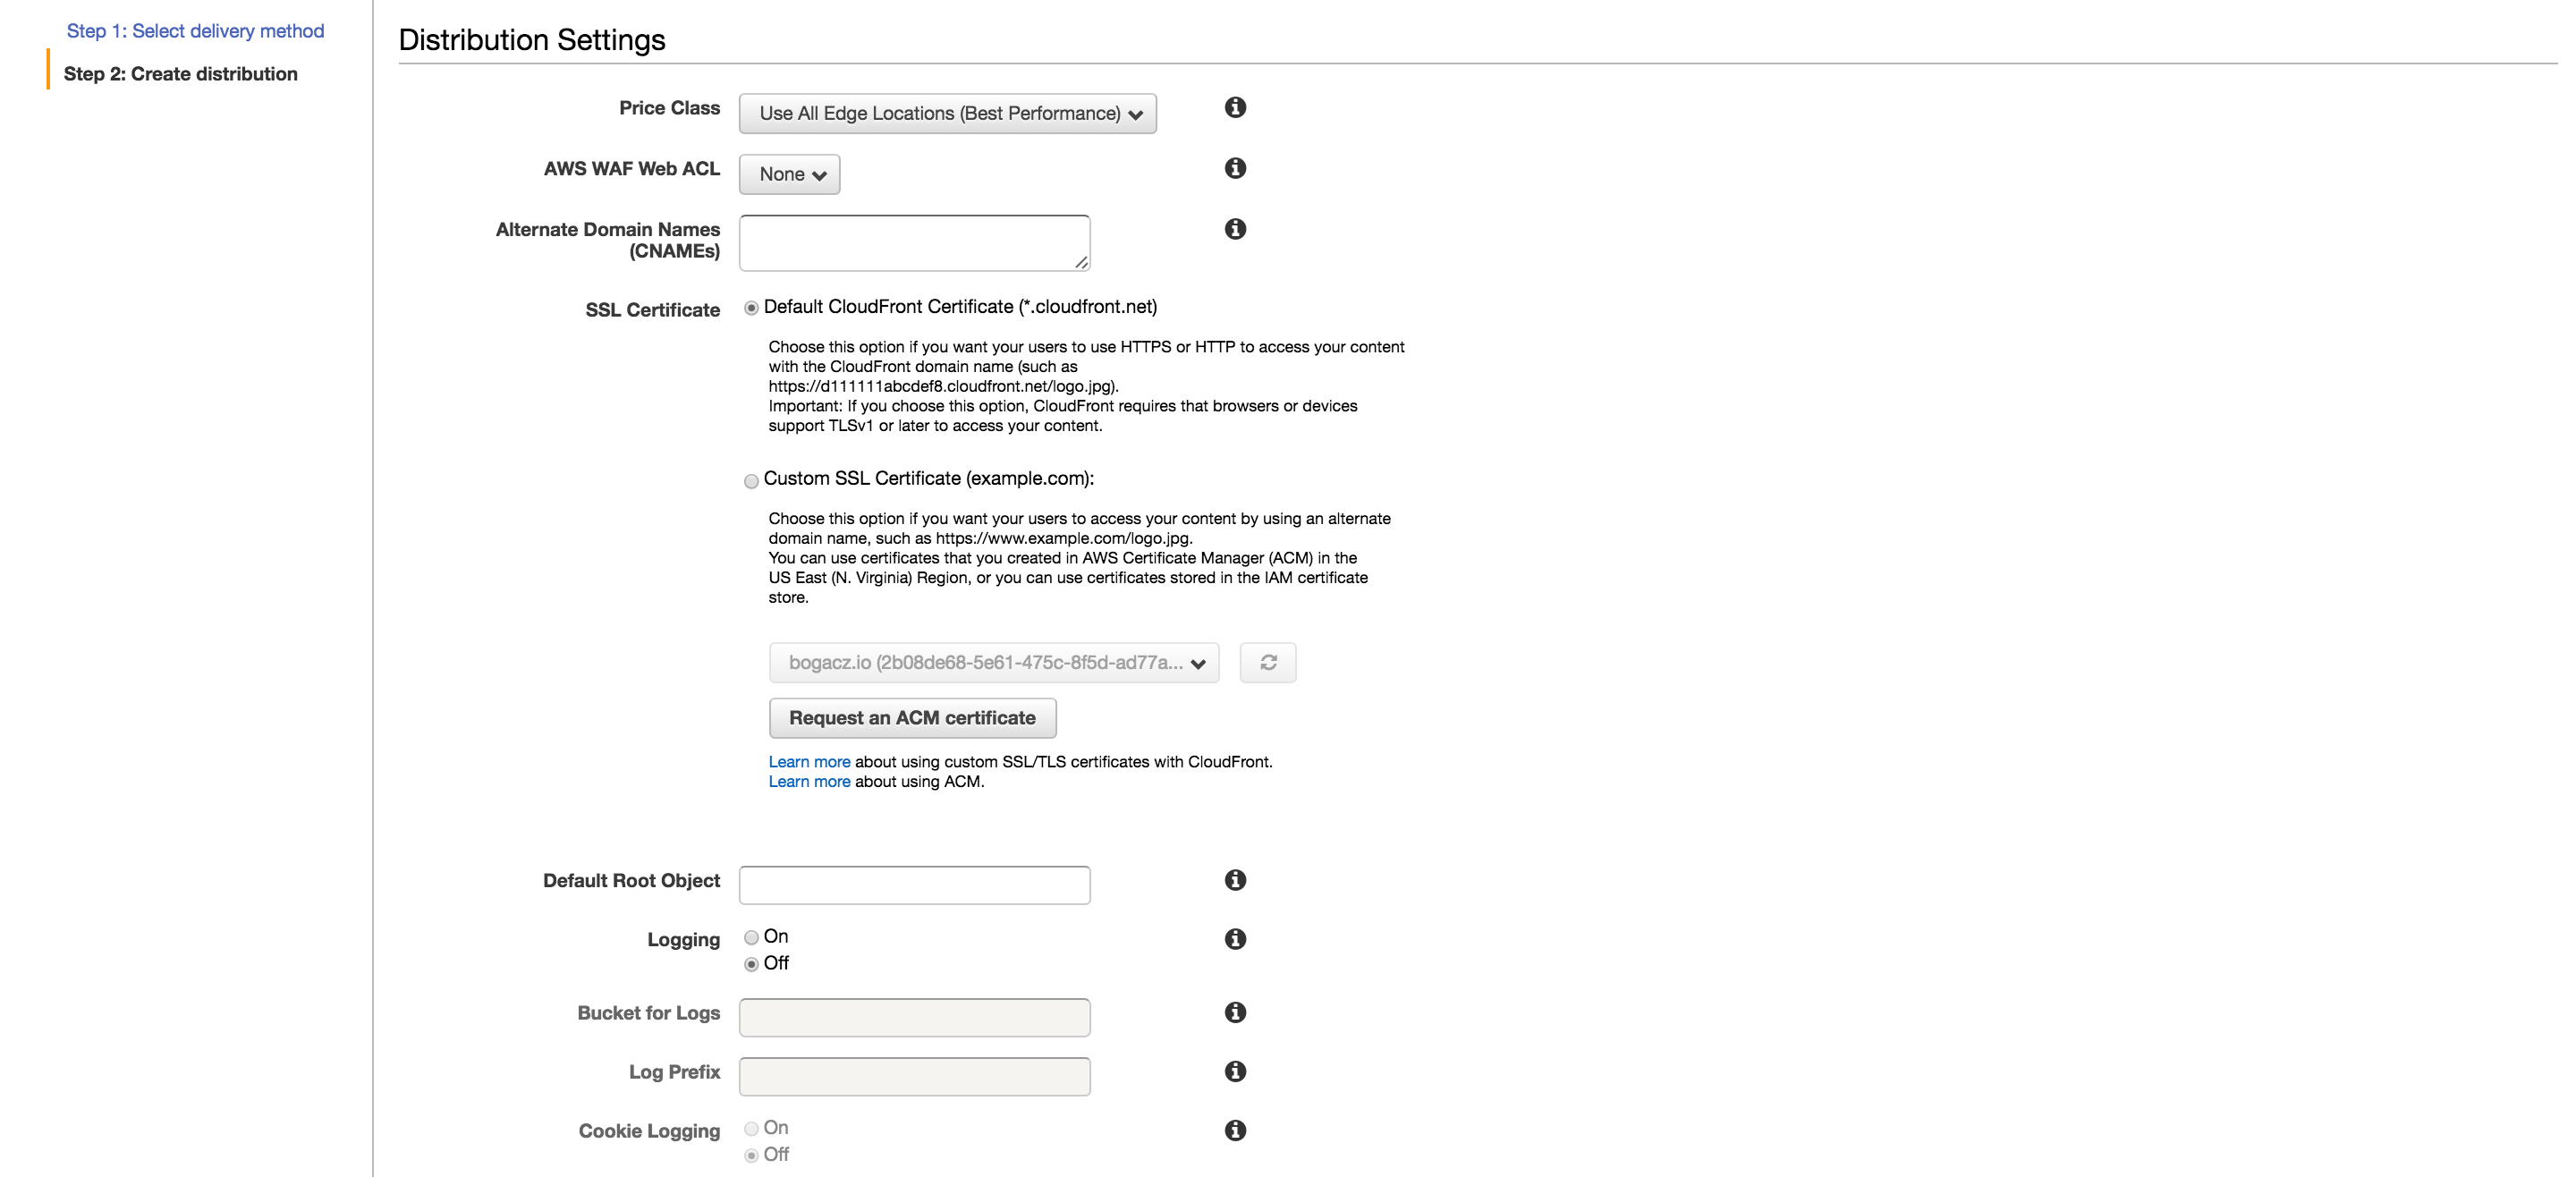
This section specifies the SSL settings, domain names to support, Edge Locations to use, and Logging settings.
Again, in order of the above image
Price ClassI went for All Edge Locations, but if you’re trying to cut costs and really only care about North America or Europe, you could choose accordingly.Alternate Domain Nameshere you want to fill in your registered domain name, and it prefixed with “www” as well, e.g. “example.com” and “www.example.com”. They can be comma separated or newline separatedSSL CertificateSelect “Custom SSL Certificate” and from the drop down below you should be able to select from your existing SSL certificates. Choose the certificate you created in step #3Custom SSL Client SupportI’d keep this as is (SNI only) because it’s simply not worth it for a personal website to have a custom IPDefault Root ObjectThis should be set to your “index.html” fileLoggingShould be set to onBucket for LogsThis should be set to the logging bucket you created in step #1Log PrefixThis should be something that makes sense to you. I went with the content bucket name suffixed with a “-cf”Cookie LoggingUnless you have a particular reason to keep track of the cookies looking at your site, I think it’s best to keep it off to keep the number of log lines down a bit
This is all this configuration needs for now, but you can also optionally make different error codes redirect to your 404 page by selecting your newly created distribution, clicking on “Distribution Settings”, and navigate to “Error Pages”
5) Get a mail service
This part has a lot of different potential solutions, and if you don’t want to have an e-mail for your domain (say if you just plan on linking an existing e-mail on the site) you can skip to step #6, although I think having a mail provider is a good idea. There’s Amazon WorkMail which could have easy integration, Google Apps, and a myriad other choices. Personally, I settled with MailGun. Whatever your provider, there will be a few different steps for verification, but furthermore, they will provide you with some records that must be added to your Route53 configuration, which we’ll look at below.
6) Configure the Route53 Hosted Zone
This is where we have to configure DNS for our domain and mail routing. To set up the necessary configuration, we’ll have to go over the the Route54 dashboard, select the hosted zone we added earlier, and click on “Create Record Set”.
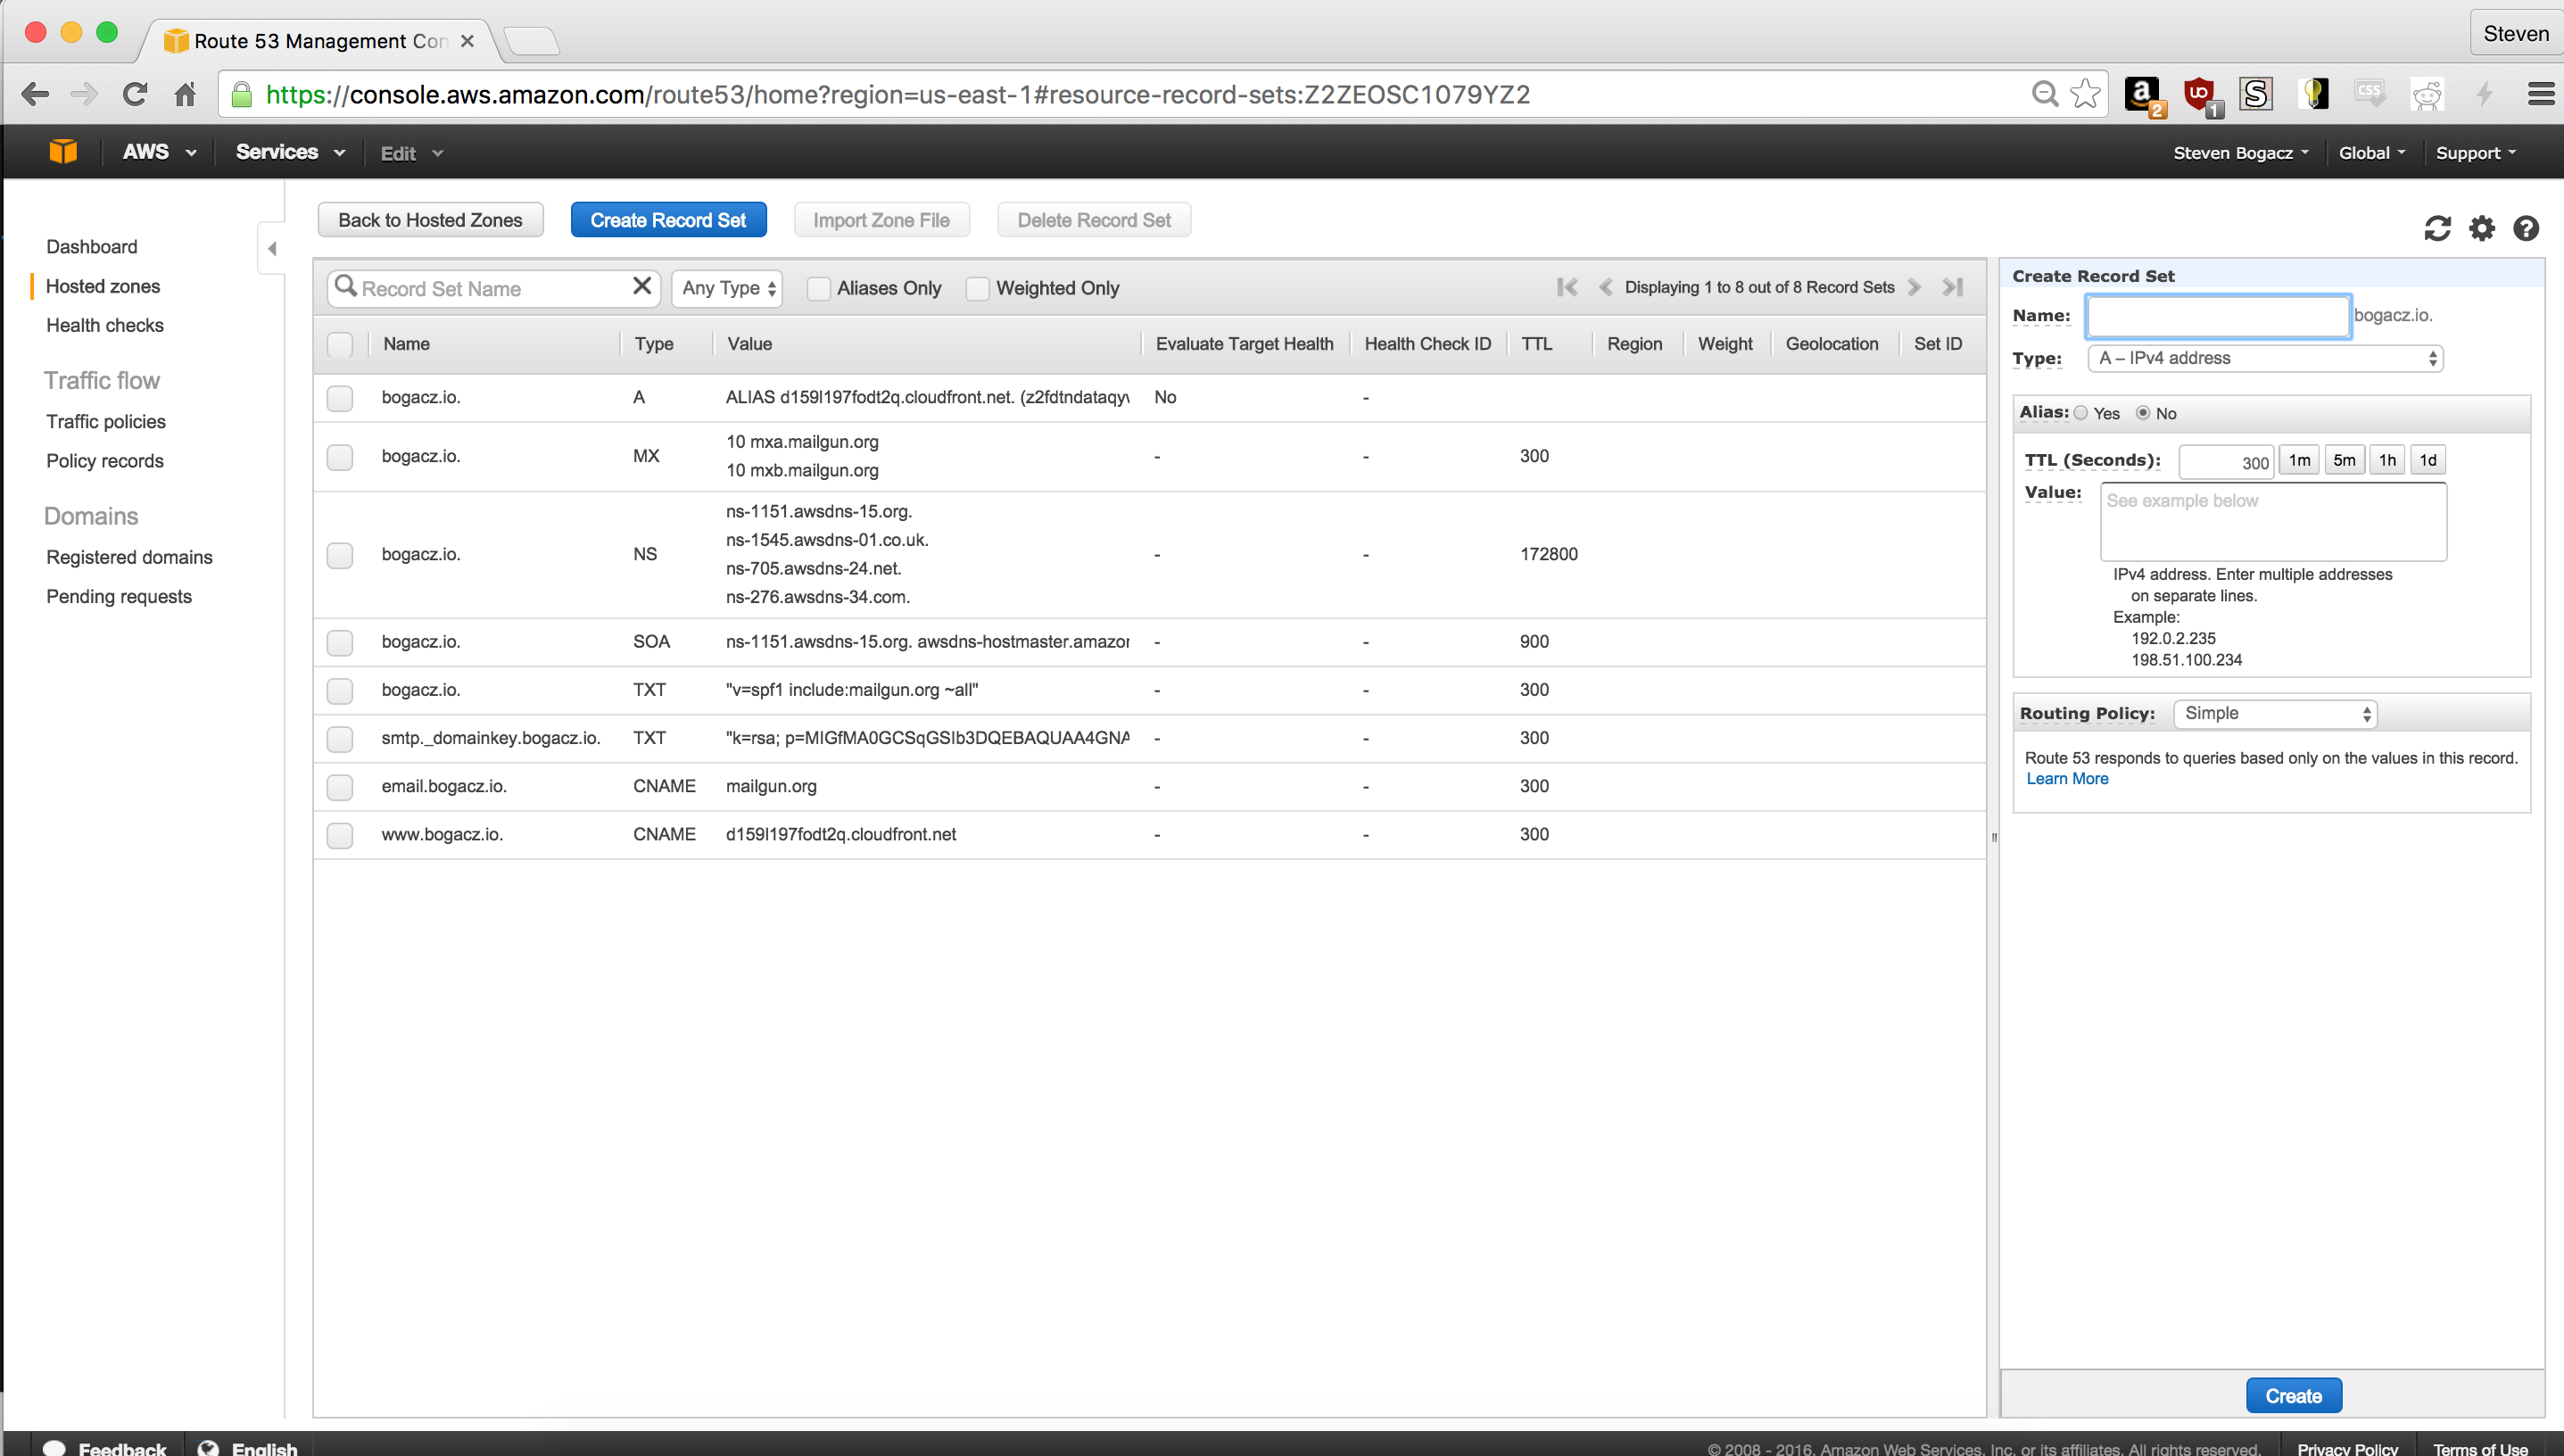
We’ll need two records for our new domain
- First one is an alias for our CloudFront distribution.
Namecan be kept empty, as your domain name should already be populated, forTypeselect “A”, and click “Yes” onAlias. When you click onAlias Targetyou should see your CloudFront distribution, select it. - Next we need a CNAME record for our domain. This is simply to make sure our “www.” prefixed domain routes correctly. Here our
Nameshould be “www” (as our .domain should be suffixed already),Typeshould be CNAME,TTLshould be “300”, and value should be set to our CloudFront distributionDomain Name, which can be gotten from our CloudFront dashboard.
For our mail settings we’ll need both TXT and MX entries into our record sets, but those will vary by provider.
7) Syncing our content at last!
Only one thing left to do, and that’s syncing our Hugo static content to S3, and updating CloudFront!
To generate our static content in our Hugo project directory we run
hugo -vNext, we want to sync the files in the generated public directory
aws s3 sync --acl "public-read" --sse "AES256" public/ "s3://<your content s3 bucket>" --exclude 'post'Finally, we want to tell CloudFront to invalidate existing records in caching servers for our website by running
aws cloudfront create-invalidation --distribution-id <CF Distribution ID> --paths /index.html / "/page/*"Where the CloudFront Distribution ID can be obtained from the ID field in the CloudFront dashboard for the distribution we configured above. Also note that we want to make sure to use wildcards where possible, since Amazon charges per distinct invalidation request.
The end
With that, you should have everything you need to register a domain, and configure an AWS-centric static to provision your new website. There are many other alternatives out there that you could use, but Amazon’s service integration, console, pricing, and above all, reliability, make it a fine choice. In the next post I’ll talk about how to automate the deploy using CircleCI.
With this I conclude my first post, and I hope that it might help or guide those looking to set up their first static website!